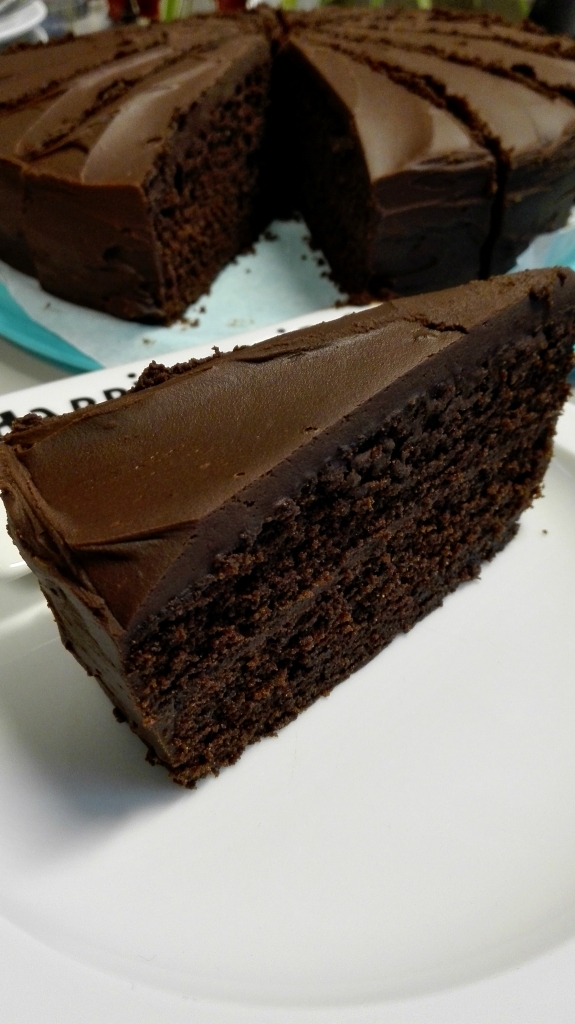
Devil’s Food Cake

Hi guys!

If you love chocolate, this might become your FAVORITE dessert! You won’t be able to live without it, you’ll dream about it, you’ll want it every day all day long. Even for breakfast… It’s the Devil’s Food Cake!

I never really knew why they called it like that. Oh boy, how stupid could I be. It is so delicious it becomes evil. I’m not kidding!

The recipe I used is from – who else could it be – Laura in the Kitchen. Did I meantion how easy this recipe is?

Devils Food Cake

What do we need:

  • 300 g self-raising flour
  • 75 g cocoa powder
  • 400 g sugar
  • 240 g butter
  • 3 eggs
  • 80 ml milk
  • 2 cups of coffee
  • pinch of salt
  • 320 ml cream
  • 420 g dark chocolate
  • 2 9 inch pans

Devils Food Cake Recipe

How to:

First we make the frosting

  1. Heat the cream. Don’t let it boil.
  2. Chop the chocolate.
  3. Poor the cream over the chocolate and let it sit for a few minutes.
  4. Stir the chocolate-cream mixture until it becomes a dark and rich ganache.
  5. Set aside for a couple of hours until it gets the right structure.

Now for the cake

  1. Preheat the oven at 180°C.
  2. Mix together butter and sugar.
  3. Put the milk and the coffee in the saucepan you used to heat the cream and heat it.
  4. Add eggs and vanilla extract to the butter-sugar mixture.
  5. Put flour, cocoa powder and salt in one bowl and blend a bit.
  6. Put half of your dry ingredients in the mixer, together with half of your coffee-milk mixture.
  7. Mix until it’s combined.
  8. Put the other half of the dry ingredients and coffee-milk mixture in the mixer.
  9. mix until your batter is smooth. Don’t worry if the batter is very thin and liquid, that’s normal :)
  10. Divide the batter over 2 9 inch pans.
  11. Bake for 30 – 35 minutes.
  12. Let the cake cool completely.

Let’s build ourselves a cake!

  1. Put frosting on the bottom layer.
  2. Stack the 2nd cake on top.
  3. Frost the whole cake.
  4. EAT THE CAKE!

Devils Food Cake by Laura in the Kitchen

Here’s the video if you want to bake along with Laura

Have a delicious day <3
xxx Sarah

Find me on:

instagramfacebooktwitterpinterest

The Original Red Velvet Cupcakes

Hi guys!

Who doesn’t love Red Velvet Cupcakes? In 2014, I made some Red Velvets but with a mascarpone-cream frosting. Now I made them with their ‘signature’ cream cheese butter frosting. I didn’t really know what to expect since I never manage to make delicious buttercream frostings. They just taste too much like butter…

But these Red Velvets with their original frosting are AMAZING! I don’t think I’ll ever make my ‘old’ frosting again. I had to keep myself from eating the frosting before putting it on my cupcakes :o Is that bad?

I know it sounds silly but I’m in love with these ‘original’ Red Velvet Cupcakes ;)

IMG_20160221_134402

What we need:

Cupcakes

  • 235 g self-raising flour
  • 15 g cocoa powder
  • 250 g sugar
  • 1/4 teaspoon salt
  • 270 g soft unsalted butter at room temperature
  • 4 eggs
  • 3 tablespoons of buttermilk
  • 1 tablespoon of red food colouring (powder or paste)
  • Cupcake wrappers
  • Cupcake trays

Frosting

  • 150 g soft unsalted butter at room temperature
  • 240 g cream cheese
  • 840 g icing sugar
  • Piping tip
  • Piping bag


How to:

Cupcakes

  1. Preheat the oven at 180°C.
  2. Sift the flour, sugar, cocoa powder and salt in your mixer.
  3. Add the butter and the eggs.
  4. Mix until the batter is smooth.
  5. Combine buttermilk, food colouring and vanilla extract and poor it in the batter.
  6. Mix until the batter gets a nice red colour.
  7. Finish the batter by hand because you don’t want to overmix it.
  8. Place the cupcake wrappers in the cupcake trays.
  9. Fill the cupcake wrappers for 2/3th and bake them for about 22 minutes.

Frosting

  1. Put butter, cream cheese and half of the icing sugar in the mixer.
  2. Mix on minimum speed until it combines, then mix at medium to high speed.
  3. Add the other half of the icing sugar.
  4. Mix until the frosting gets stiff and pale. Don’t make it too stiff though.
  5. Let the cupcakes cool completely before frosting them.
  6. Put the piping tip in your piping bag and frost! :D

IMG_20160221_134421

I’ve also found a new YouTube channel to share with you because I absolutely LOVE Jemma from the London based bakery Crumbs and Doillies. (I HAVE to get to London soon..) She made these Red Velvets and her video is just awesome! I hope you enjoy :D

Have a delicious day <3
xxx Sarah

Find me on:

instagramfacebooktwitterpinterest

Carnival Cupcakes

Hi guys!

It’s Carnival or Mardi Gras today! Unfortunately that does not mean funny costumes for me… although I really think they should introduce that into working life as well. Why let the kids have all the fun?

But we adults have the ability to make food! Or at least some of us ;) And that’s exactly what I did :) I used my favorite source in the world – Pinterest – and found the perfect kind of cupcakes for Mardi Gras: Funfetti Cupcakes! You know, the ones with the colourful dots inside the cake. But I guess I didn’t use the right ingredient or not enough of it because there are no colourful dots to be found in my cupcakes :( Oh well, next time :)

Carnaval Cupcakes

Although the colourful dots were missing, it was still super delicious and fun to look at!

What we need:

  • 220 g butter
  • 220 g self-raising flour
  • 220 g sugar
  • 4 eggs
  • +- 120 g powder sugar
  • 400 ml heavy cream
  • 500 g mascarpone
  • cupcake wrappers
  • edible confetti
  • piping bag + piping tip

Mardi Gras Cupcakes

How to:

  1. Preheat the oven at 180°C.
  2. Mix together butter and sugar.
  3. Add the eggs and mix until the batter becomes smooth.
  4. Sift the flour and mix until the batter is smooth.
  5. Add a bunch of confetti and blend well.
  6. Place the cupcake wrappers in the mold. Fill them for 3/4th with batter.
  7. Bake for about 25 minutes.
  8. Whip up the cream and set aside.
  9. Mix mascarpone and powder sugar.
  10. Gently blend in the whipped cream, using a spatula.
  11. Put a piping tip in the piping bag and fill the bag with frosting.
  12. Frost the cupcakes and add as much sprinkles as you like :)
  13. CELEBRATE!

Carnival Cupcakes

Have a delicious day <3
xxx Sarah

Find me on:

instagramfacebooktwitterpinterest


No Bake Strawberry Chocolate Tart

Hi guys!

The recipe I’ve got for you today is not just good. It’s awesome!
Delicious and a little bit decadent. Just the way we like it ;)
Oh and super easy too!

I was scrolling up and down Pinterest because I really really wanted to bake make something. You know that feeling? I only had two eggs so a cake was not possible. Hmmm… There it was! I saw this gorgeous, delicious and slightly decadent tart from Home Cooking Adventure. I was sold. And I didn’t even need eggs! Although I did have to go to the store xD

No Bake Strawberry Chocolate Tart

What we need:

  • 30 Oreo cookies
  • 110 g melted butter
  • 200 g milk chocolate
  • 100 g dark chocolate
  • 200 ml heavy cream
  • strawberries
  • Tart pan
  • optional: white chocolate flakes

IMG_20160127_125546

How to:

  1. Crush the oreos to dust and add the melted butter.
  2. Put the crushed Oreos in the pan and make the bottom. Freeze until you finish the rest of this recipe.
  3. Heat the heavy cream.
  4. Cut the milk and dark chocolate in pieces.
  5. Poor the heated cream over the chocolate and let it sit for about 1 minute before stirring.
  6. Take out the tart pan and fill the bottom with the chocolate.
  7. Decorate with strawberries.
  8. Put this delicious tart in the fridge for at least 3 hours or over night.
  9. Optional: Decorate with white chocolate flakes

Have a delicious day <3
xxx Sarah

Find me on:

instagramfacebooktwitterpinterest

Easy Christmas Cookies

Hi guys!

Merry Christmas

I wish you all a very Merry Christmas and a happy New Year! Let there be love, fun, happiness and… food! ;D

Today’s menu: super easy Christmas Cookies to hang in your Christmas tree :) I’ve said it before with my Christmas Jam Cookies: What’s Christmas without cookies? Just a meeting!

IMG_2924

What we need:

  • 250 g butter
  • 165 g sugar
  • 1 egg yolk
  • 250 g flour
  • pinch of salt
  • Christmas cookie cutters
  • plastic foil
  • baking plate
  • baking paper
  • a straw
  • ribbon


Christmas Cookies

How to:

  1. Mix together butter and sugar until fluffy.
  2. Add the egg yolk.
  3. Sift the flour and add it together with the salt to the mixture.
  4. Mix until everything gets combined and it forms a real dough.
  5. Wrap the dough in plastic foil and store for 30 – 60 minutes in the fridge.
  6. Remove the foil and roll out the dough.
  7. Cut out different Christmas figures.
  8. Heat the oven at 190°C.
  9. Place the cookies on a sheet of baking paper on a baking plate and make a little hole in the cookie with the straw.
  10. Bake for 15 minutes at 190°C.
  11. Let the cookies cool on the baking plate for a bit until placing them on a rack to cool completely.
  12. Take some ribbon and put it through the cookie-hole to hang them in your tree :)

IMG_2936

Merry Christmas!

Have a delicious day <3
xxx Sarah

Find me on:

instagramfacebooktwitterpinterest

Christmas Jam Cookies

Hi guys!

Nothing says Christmas more than Christmas Cookies… I’m sorry but you can’t say you’ve celebrated Christmas if you haven’t had any cookies to go with it. You just can’t.

Sooooo I’ve made some yummy Jam Cookies! They can be used for several occasions because they aren’t Christmas exclusive as you can see but these star shaped cookies fit Christmas perfectly as well :)

IMG_2920

What we need:

  • 250 g butter
  • 165 g sugar
  • 1 egg yolk
  • 250 g flour
  • pinch of salt
  • raspberry jam (or any kind of jam you like)
  • cookie cutters in 2 sizes
  • plastic foil
  • baking plate
  • baking paper

Christmas Jam Cookies

How to:

  1. Mix together butter and sugar until fluffy.
  2. Add the egg yolk.
  3. Sift the flour and add it together with the salt to the mixture.
  4. Mix until everything gets combined and it forms a real dough.
  5. Wrap the dough in plastic foil and store for 30 – 60 minutes in the fridge.
  6. Remove the foil and roll out the dough.
  7. Cut out as much stars as you can.
  8. Cut out a smaller piece in half of the stars (these will be your top stars).
  9. Heat the oven at 190°C.
  10. Place the cookies on a sheet of baking paper on a baking plate and bake for 15 minutes at 190°C.
  11. Let the cookies cool on the baking plate for a bit until placing them on a rack to cool completely.
  12. Take your ‘full’ stars and put some jam on them.
  13. Sprinkle some powdered sugar on the top stars (the ones with the holes).
  14. Place the top stars on top of the jam.
  15. Serve! :D

Jam Cookies

Merry Christmas!

Have a delicious day <3
xxx Sarah

Find me on:

instagramfacebooktwitterpinterest

Red Velvet Christmas Crinkle Cookies

Hi guys!

I’m sorry forgot posting a Christmas recipe last Tuesday. It’s not that I didn’t want to or didn’t try. I was making these awesome Red Velvet Crinkle Cookies Tuesday night at around 10 pm. I had hoped to finish them in time to post them before midnight but my oven had other plans…

Everything went well until I put the first batch in the oven. After just a few minutes I started to smell something weird. My first thought was: “Djeez these cookies smell bad, my god!” You know something’s really wrong when there’s smoke coming out of the oven!

NO PANIC! I had it all under control. Except for that awfull burned smell that lived in our appartment for two days…

But the second time went perfectly well as you can tell by these yummy Crinkle Cookies :)

Red Velvet Crinkle Cookies

Store the cookies in an airtight container. If you don’t, the cookies will become soft and they’ll taste more like cake than cookie xD It becomes a cake-cookie :p Tastes great too.

I was lucky to try a cookie before going to bed. It was crunchy on the outside and soft in the middle. Just the way they are supposed to be.
I had put them in a box and left them on the table when I went to bed. You never guess what I saw when I woke up: the cookie box had been opened!

I secretly think the boyfriend has something to do with it. He may have stolen a cookie when he got home from his boys night out or he might have just looked inside to see what I made. Either way, he forgot to close the box and left his marks! Busted! ;)

Red Velvet Christmas Crinkle Cookies

What do we need:

  • 390 g self-raising flour
  • 25 g cocoa powder
  • 180 g butter
  • 160 g sugar
  • 3 eggs
  • 3 teaspoons red food coloring
  • 130 g powdered sugar
  • pinch of salt
  • baking paper

Crinkle Cookies going in the oven

How to:

  1. Put the flour, cocoa powder and salt together in a bowl and set aside.
  2. Mix together butter and sugar until the sugar is absorbed by the butter.
  3. Add 1 egg at a time and mix until smooth.
  4. Add the food coloring.
  5. Add the other ingredients you had set aside in the bowl and mix until the batter is smooth.
  6. Put the dough in a bowl, wrap it with foil and put in the fridge for about 2 hours.
  7. Butter your hands and make small balls of dough.
  8. Put the powdered sugar in a bowl and roll every ball in the sugar. One  at a time.
  9. Place the balls on a baking sheet.
  10. Bake the cookies for 15 minutes at 180 degrees celsius.

Have a delicious day <3
xxx Sarah

Find me on:

instagramfacebooktwitterpinterest


Homemade Chocolate Popsicles for the best Hot Chocolate

Hi guys!

December is right around the corner, the days are getting shorter and it’s impossible to go outside without your thickest jacket and a scarf. Don’t even think about how cold your feet get from walking outside for a minute…

My ultimate solution: Homemade Hot Chocolate! And these Homemade Chocolate Popsicles make it even better ;)

Hot Chocolate Popsicles

December also means Christmas and I believe these Chocolate Popsicles make the perfect drink for every cozy Christmas party! It may not look very Christmas-y but the feeling you get from drinking hot coco together sure is :)

What do we need:

  • White Chocolate
  • Milk Chocolate
  • Dark Chocolate
  • Wooden spoons
  • Piping bags
  • Bowls to melt the chocolate in
  • Plastic cups
  • Toppings

Ingredients for our Homemade Chocolate Popsicles

How to:

  1. Melt your white, milk and dark chocolate in separate bowls. Do this by putting them in sessions of and stir in between each session.
  2. Put the melted chocolate in piping bags. Use separate bags as well.
  3. Cut off the tip of the piping bags.
  4. Choose what kind of chocolate popsicles you want: all in one colour, 2 colours, 3 colours, …
  5. Pipe your chocolate in the cups the way you like.
  6. Put the spoons in the cups. Your spoons should be completely covered (not the handle)
  7. Add your toppings.
  8. Let the chocolate popsicles cool and harden.
  9. After the popsicles have completely hardened, pull them out the cups. It may take some serious pulling but I know you can pull it off ;)
  10. Dip them in warm milk!
Hot Chocolate Popsicles before cooling

Before pulling them out

Hot Chocolate Popsicles for Hot Chocolate Milk

After :)

I’ve tried something special: adding some salted caramel from Colac to the popsicle. It worked! But you have to make sure you add just a little because the next layer of chocolate has to connect to the one before the caramel. Otherwise the popsicle won’t hold together.

I think restaurants or little tea rooms could easily make this for the holidays or just during Winter, don’t you think so too? :D

Have a delicious day and a warm Winter <3
xxx Sarah

Find me on:

instagramfacebooktwitterpinterest

Source of inspiration: PS by Dila

Marzipan Potatoes

Hi guys!

You already know I can’t wait until Christmas is here but there is one thing I absolutely LOVE about this time of the year and St. Nicholas: marzipan! I’m addicted to it and I swear, I could eat a whole package at once!

Sooooo I went looking for a recipe… I wish I hadn’t because it’s way too easy! I thought if it would be very hard to make, I’d certainly never make it again but it’s just sooooo easy! You can barely call it a recipe ;)

It was the lovely Annelies from Een Lepeltje Lekkers who made this last year and it’s so good I didn’t adapt it at all. So thank you Annelies for these yummy Marzipan Potatoes!

IMG_2756

What we need:

  • 150 g powder sugar
  • 150 g almond powder
  • 2 tablespoons of crystal sugar
  • 2 tablespoons of cocoa powder
  • 1 egg white

IMG_2750

How to:

  1. Mix together the almond powder and the powder sugar.
  2. Add the egg white.
  3. Mix together with a spoon until the mixture begins to stick together.
  4. Blend with your hand(s) until it becomes a ball.
  5. Knead until perfect marzipan starts to form.
  6. Cut the ball in smaller pieces and roll them into little balls.
  7. Put together sugar and cocoa powder in a bowl.
  8. Put the little marzipan balls in the bowl and start rolling them around. Do this one little ball at a time.
  9. Place the Marzipan Potatoes on a plate so your kids, guests, family, … can attack!

Have a delicious day <3
xxx Sarah

Find me on:

instagramfacebooktwitterpinterest


No bake Snickers Cheesecake in a jar

Hi guys!

I’ve seen so many desserts in a jar lately and I absolutely love them! I’ve been dying to try some myself but refused to buy jars in the store because I thought they were too expensive. So for a very long time: no desserts in a jar for me…

But my mom collects the jars from the jam for me. Apparently. Yay me! Now I could finally try some desserts in a jar myself :D

The first attempt was this recipe: Snickers Cheesecake in a jar!

Snickers-cheesecake-in-a-jar

It’s a bit different from the Cheesecakes I’ve made so far. Other ingredients for example. I was very curious how my testing audience (the neighbours) would feel about this recipe. But they liked this little bomb of calories. Oh yes, this really is a little calorie bomb :)

Snickers Cheesecake in a jar recipe

What we need for 2 jars:

  • 2 jars
  • 120 g cream cheese
  • 180 ml heavy whipping cream
  • 1/
  • 100 g sugar
  • 150 g crushed Oreo cookies
  • Snickers, cut in pieces
  • Caramel topping

Snickers04

How to:

  1. Beat together cream cheese, vanilla and sugar until creamy.
  2. Whip the cream in a different bowl.
  3. Fold the whipped cream into the cream cheese mixture.
  4. Put the crushed Oreos on the bottom of the jars and stamp down.
  5. Fill a piping bag with the cheese mixture and cut off the tip.
  6. Fill the jars for 3/4 using the piping bag.
  7. Drizzle some caramel on top.
  8. Finish with the Snickers.

This recipe was inspired by Raining Hot Coupons

Snickers02

Have a delicious day <3
xxx Sarah

Find me on:

instagram facebook twitter